Creating a layout grid in Illustrator

Here’s a short tutorial on how to create a layout grid in Illustrator. Creating grids is relatively simple in Indesign, but not so in Illustrator. Here’s a short tutorial, with a downloadable example file.
A short history of the number 12!
Our goal is to build a 12-column modular grid.
Let’s look at that number for a moment. The face of the world would probably have changed if we’d had twelve fingers!
Instead of counting on ten fingers (decimal base), we would have counted in the much more practical duo-decimal base. 12 is an “abundant” number, since the sum of its integer divisors is greater than its double (1+2+3+4+6+12 = 28), while 10 is said to be “deficient” (1+2+5+10 = 18).
The base 12 can be found, for example, in the division of hours, months and angles (cf: 12×30=360°). When it comes to page layout, 12 can be divided into 2, 3, 4 or 6, giving us a wide range of possibilities.
Our ancestors knew this system from time immemorial, counting the phalanges of the hand while omitting those of the thumb (which is used to point to the phalanges of the other fingers). This is a highly practical technique for counting, since with two hands you can count units on one side and dozens on the other. So you can count up to 144 by hand for your game of hide-and-seek.

Preamble
We agree that Indesign is much better suited to managing grids. However, we often start creating visual identities on paper, then move on to Illustrator (AI). Once the idea has been sketched out, we prototype the graphic universe in this software.
Indeed, it’s in AI that the main layout principles will be worked out, which will then have to be applied to both screens and paper. This is where having a good grid at the outset comes in handy. It saves time for the rest of the project and ensures consistency.
Afterwards, other software (Indd, Ae, Xd…) specific to each media will take over.
Create a modular grid
in illustrator
Let’s start with a 210x297mm format.
We will opt for a 3mm margin around the document.
- Make sure rules are enabled (⌘ + R) as well as commented markers (⌘ + U).
- Find the center of the document, hold down the Option key and click. Enter the dimensions “210mm-24pt” and “297mm-24pt”, equivalent to a 12pt gutter around the document. Click on OK
- Change rectangle color to #000 with 20% transparency.
At this point, you should have a rectangle measuring 201.533 mm x 288.533 mm.
Next, we will need to take into account our font size to calculate our line spacing. Let’s assume we are working with a standard text size of 10 pt. Knowing that the most standard setting for line spacing is between 120% and 140%. That is, between 12pt and 14pt.
The height of the rectangle (288.533mm) is divided by the chosen line spacing. Let’s choose 12pt (4.233mm), i.e. “288.533 / 4.233 = 68.1627”. This gives us the number of lines that will fit on the page. However, we are going to prefer a multiple of 8, with the choice of 64 or 72. Let’s go for 64, which will make the line spacing a little more airy.
Now take the height of your rectangle (288.533 mm) and divide by 63 (64-1line) to get 4.5798 mm (12.9821 pt). We will use this figure for line spacing and for our gutters. Note that the line spacing will be 129.821%.
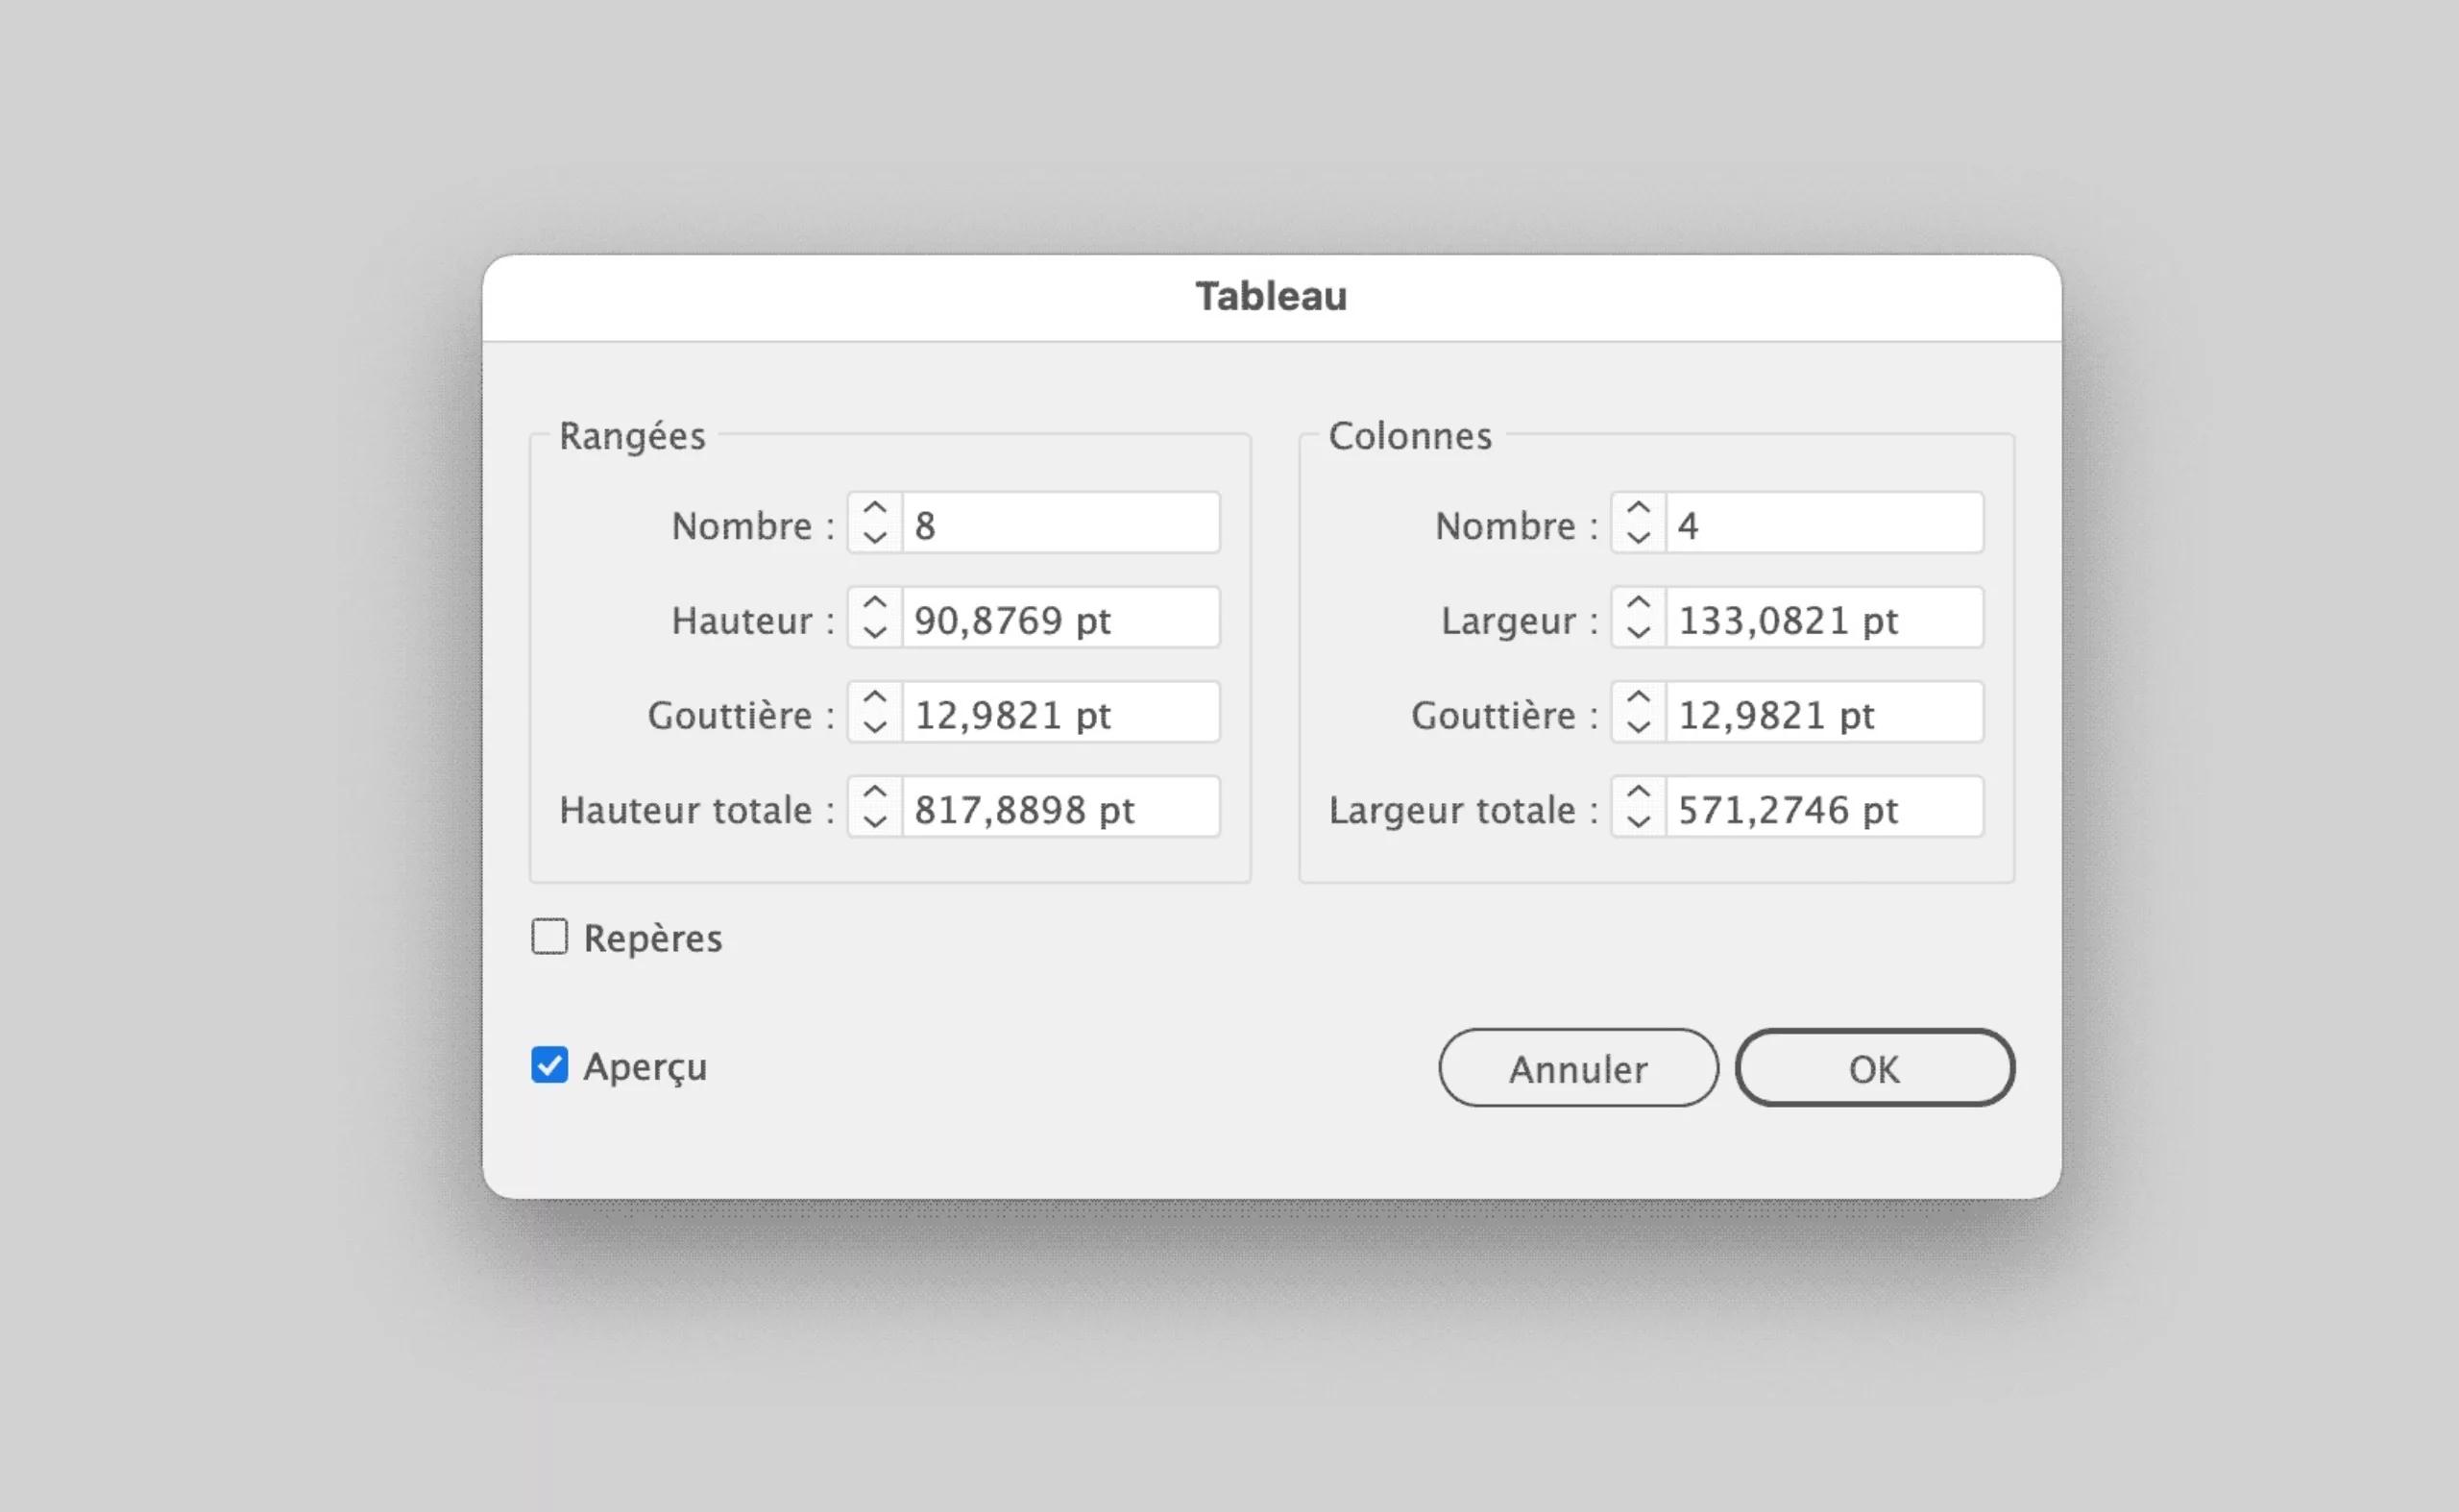
- Select the rectangle, then go to “Object > Trace > Table”.
- Check the Preview box, but leave the “markers” box unchecked for the moment.
- Enter the number of rows (8) and columns (4).
- Fill in the new 4.5798 mm gutter.
- Click on OK
Select all the boxes and group them together (⌘ + G) for easy selection later. Return to Object > Trace > Table… and tick the Add guides box. Now click on OK.
Create a new layer and name it “Guides”.
Select the guides and copy them to this layer. Using the white arrow, we will reduce these guides to A4 size.
Turn the lines into guides via View > Guides > Create guides (⌘ + 5).
Lock the “Guides” layer.
Creating the text grid
Create a new layer and name it “Text grid”.
Create a line through the upper grid. Give it a red line outline.
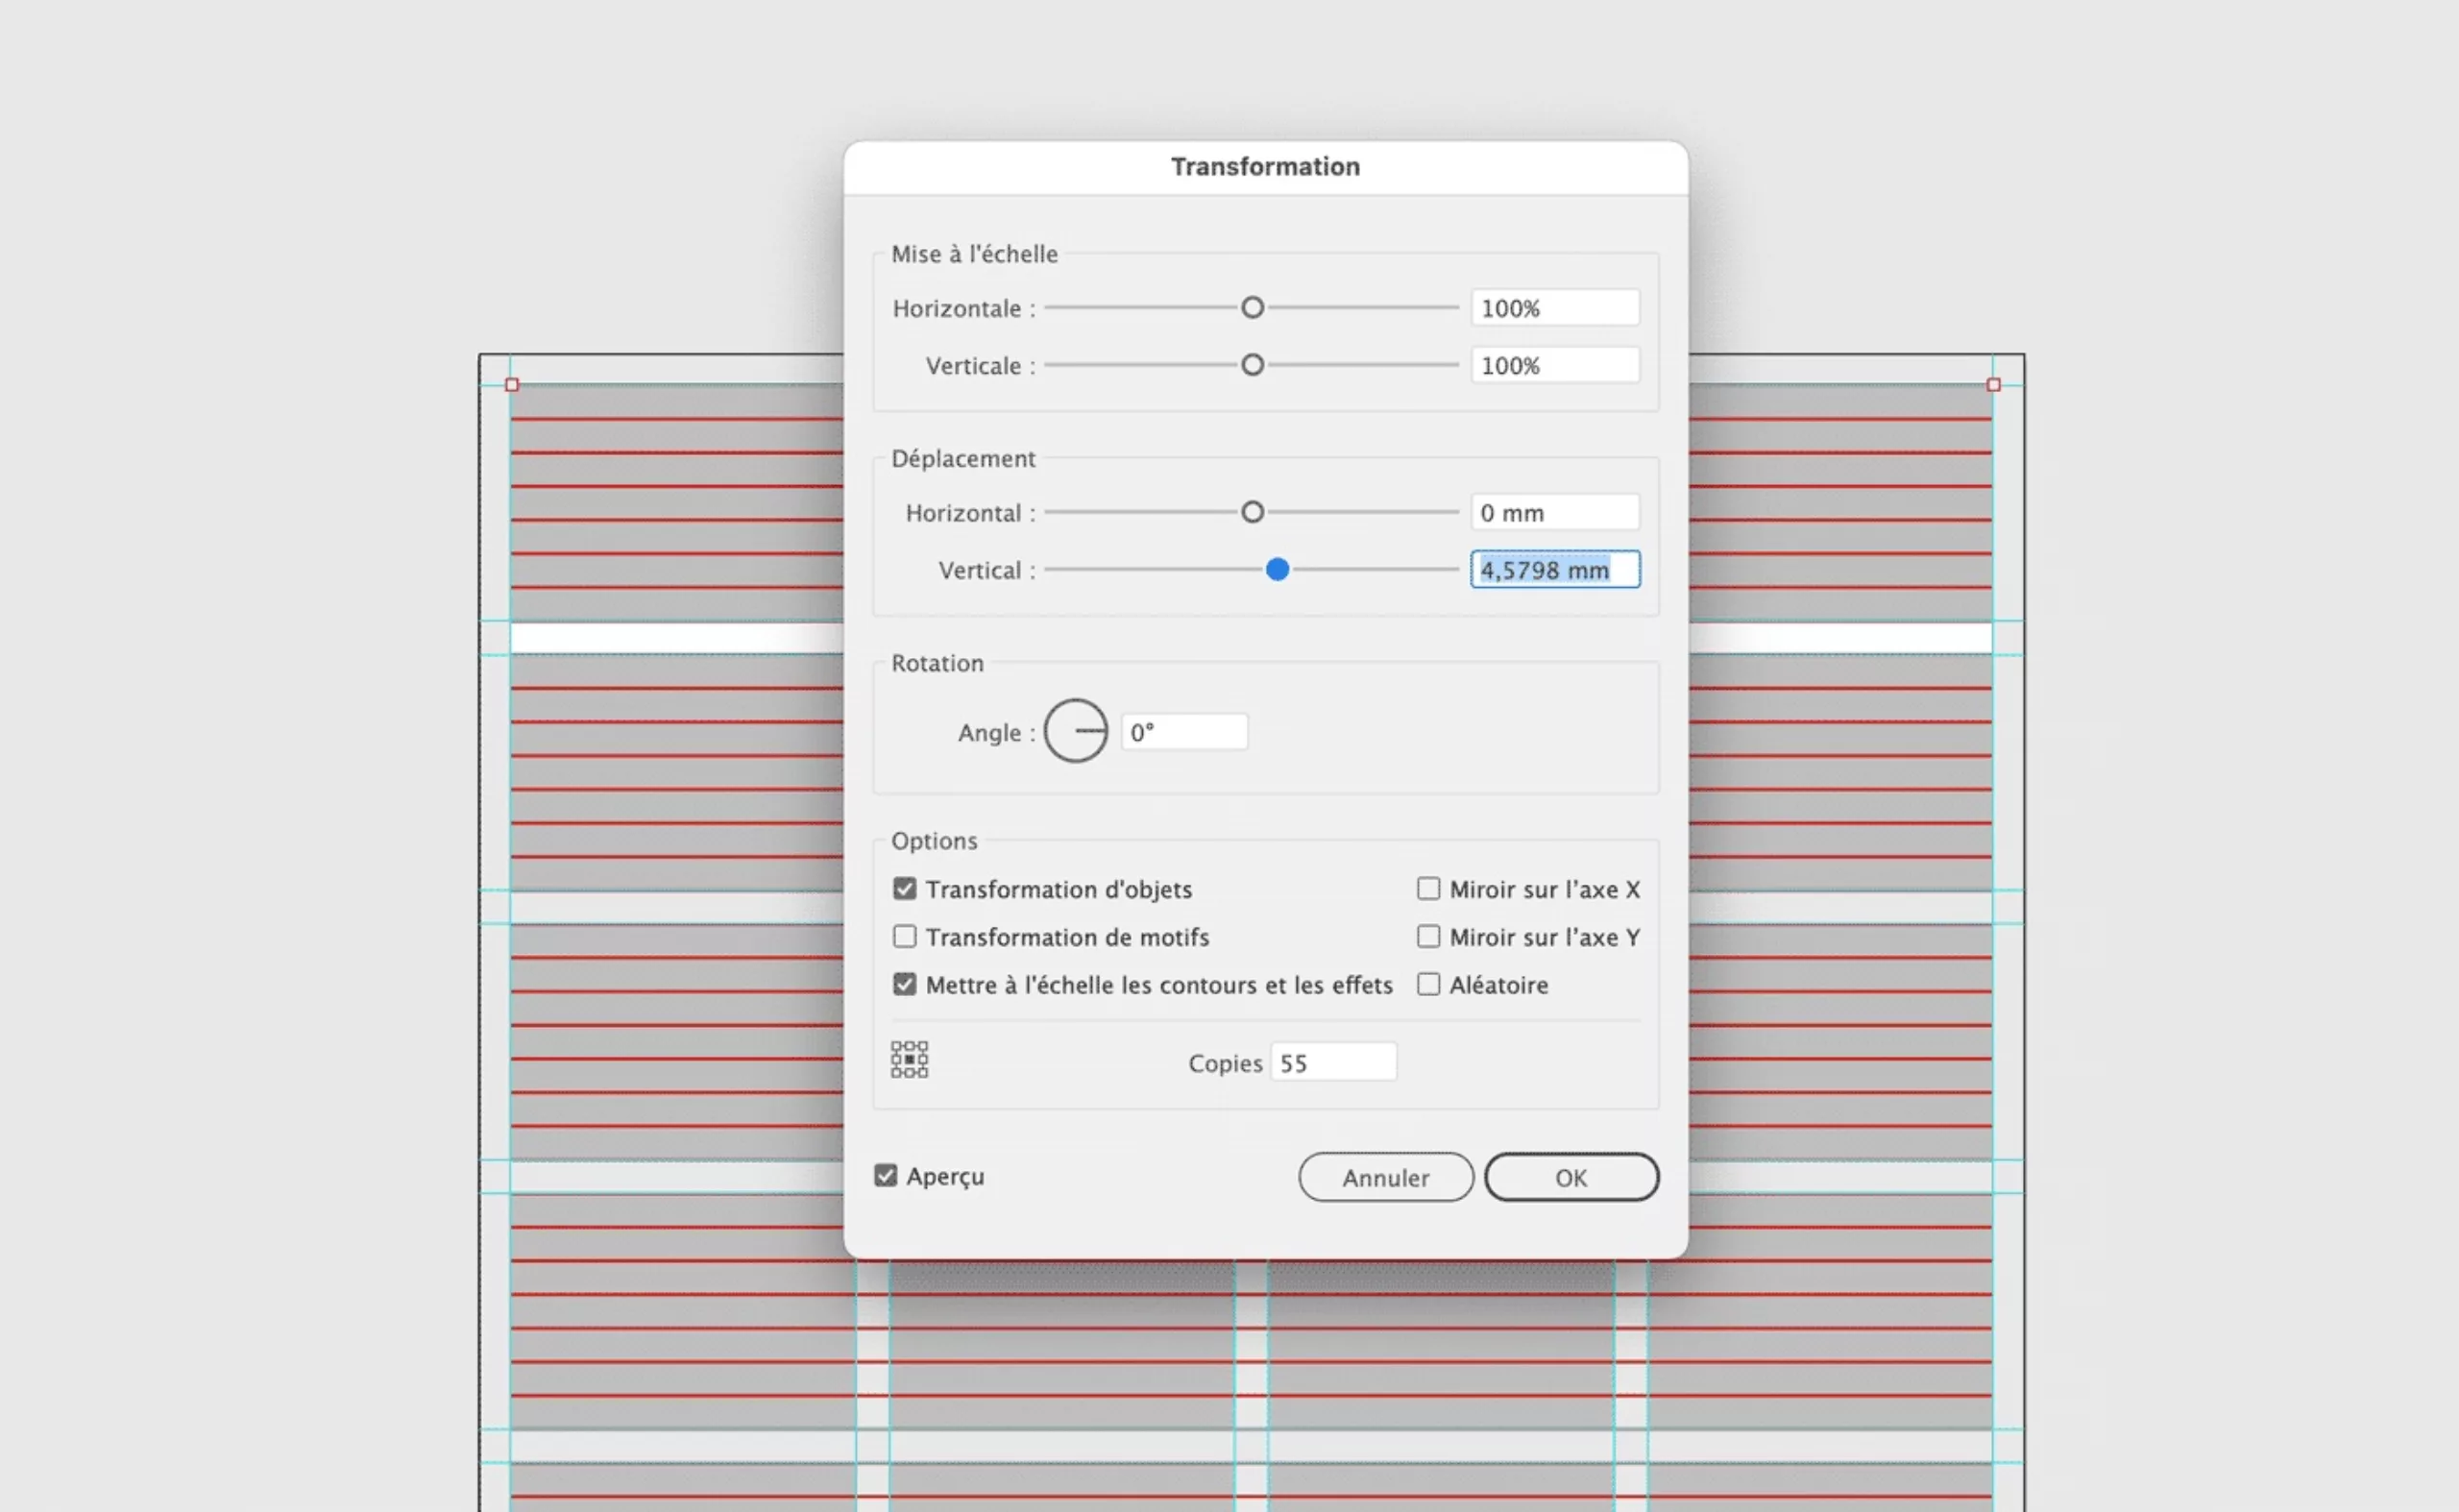
Go to Effects > Distortion and transformation > Transformation
The “Preview” checkbox must be selected.
We now want to reproduce the line we have just created vertically at an offset of 4.5798 mm, with a number of copies of 63.
Click on OK
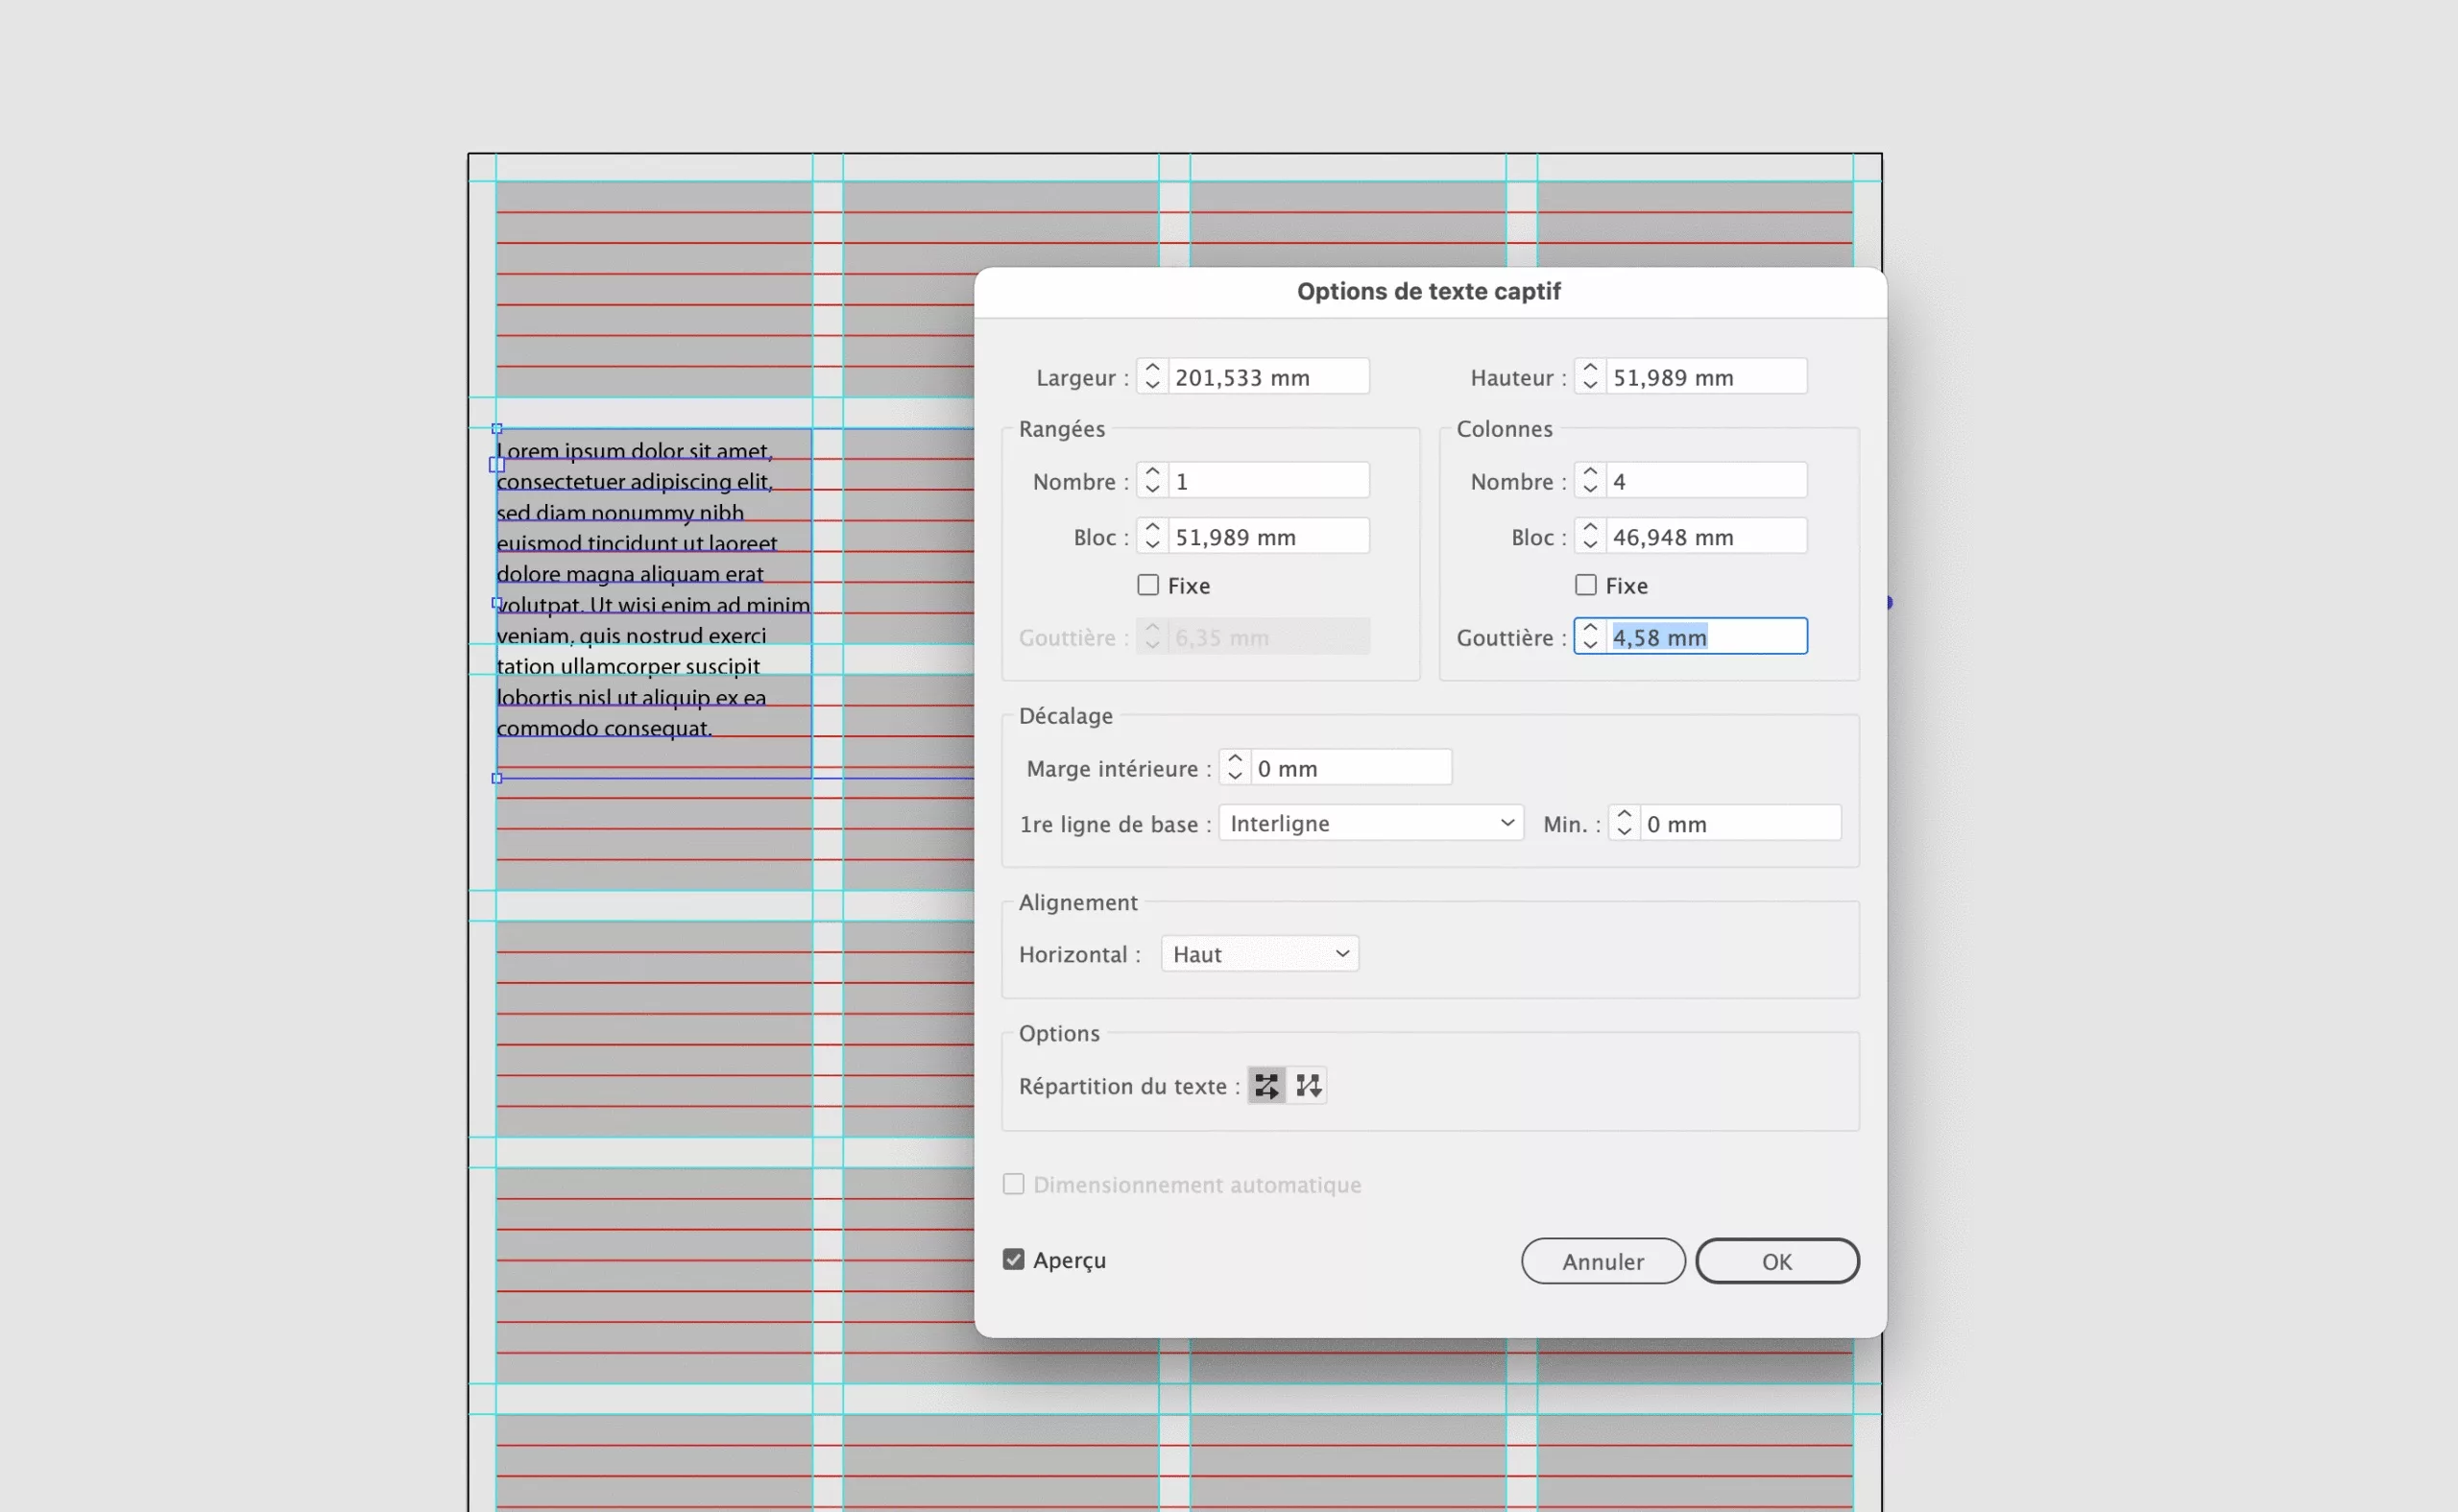
Let’s create text blocks in 10pt size with 4.5798 mm (12.9821pt) line spacing. With “Text / Captive text option”, we can create columns with 4.5798 mm gutters. Then select “Offset / 1st base line: Line spacing”, so that your text lines are aligned with the grid.
Enfin, nous allons rajouter un calque avec la grille de 12 colonnes. En procédant comme au début, en créant un rectangle centré de 201.533 mm x 288.533 mm que nous allons diviser en 12 colonnes avec le menu “Objet > Tracé > Tableau”. Toujours avec nos gouttières de 4,5798 mm.
This brings us to the end of our illustrator grid.
The final trick is to create an Illustrator symbol using this grid, and then add it to your AdobeCloud library so that you can use it in all future Illustrator documents.
To do this, once you’ve created the symbol, drag it from the work plan to the AdobeCloud library.
Now you can download the template by clicking on the image below!
Bonus: The A4 “Golden Grid”
As a bonus, you will find in the source file an example of a “Golden Grid” (in A4 version, not in American Letter format!).
Here are other resources about this type of grid: Golden Ratio.

On the subject
-

Jacques Massacrier’s “Savoir Revivre”
It is a cult classic, ahead of its time. For some, Jacques Massacrier’s “Savoir Revivre” was nothing short of a ‘bible’.
The first edition, published in 1973, was a literary phenomenon, selling over 500,000 copies and being translated into twelve languages. It was a book that captivated an entire generation. -

Tote bag, a new social totem?
The tote bag has become an essential part of our everyday urban lives.
What does it say about our society, our times, our habits and our behaviour? -

Reza Abedini, father of iranian contemporary graphic design
Being a designer like Reza Abedini in a country such as Iran means juggling with an incredible artistic, visual and calligraphic heritage that is 3000 years old.